Motors
In Physics Mode motors can be added to tracks.
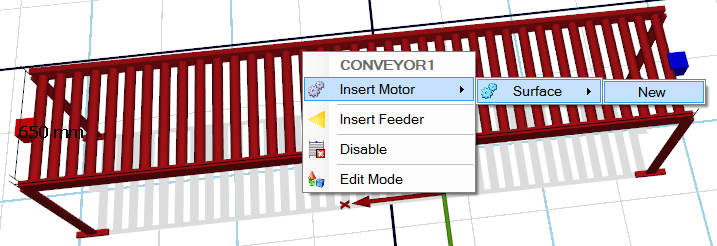
To add a motor to a track you, select the track and right click.
Select a motor from the context menu.
When a motor has been added to a track, it will be listed in the motor menu as Motor1 and so forth according to the order in which they are added.
The numbering runs across the different types of motors.
A motor can be used on an unlimited number of tracks.
After a motor has been added to a track, it will become available to other tracks through their context menu and properties window in the motor menu drop down list.
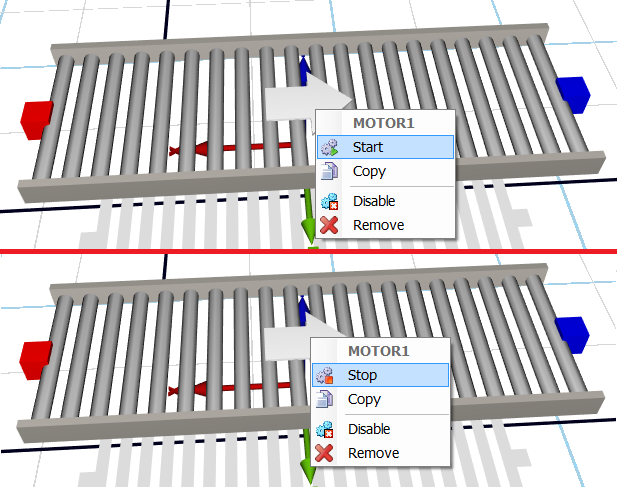
A motor is visualized by an arrow that points in the traveling direction.
The arrow is red when the motor is stopped and green when the motor is running.
The default motor direction is from the track’s red fix point to its blue fix point.
To start/stop a motor for standalone test purposes, either right click on the arrow and select start, double click the arrow or select it and press the plus (+) key.
Selecting the motor and pressing the minus (-) key will change the direction of the motor.
When the same motor has been used on several tracks, start, stop and change of direction will apply to all identical motors.
There are several different types of motor available for use.
- Surface Motor – A surface motor moves loads.
- Vector Motor – A vector motor lets the track ascend and descend. The direction angle for a vector motor can be defined in the properties. In the operation menu you set the x-y-z coordinates in the direction property.
- Rotation Motor – A rotation motor lets the track rotate horizontally. After a rotation motor has been added, you will find a rotation property in the motor menu in the properties window for the track, where from you can select the rotation motor’s position on the track.
- Eccentric Motor – An eccentric motor lets the conveyor move from a fixed angle. After an eccentric motor has been added, you can set its fixed angle, in the properties window for a conveyor, to be at the start, end or center of the conveyor. Vertically fixed angle lets the full length of the conveyor ascend/descend. In the properties window for the eccentric motor you can set a limit value (mm) for the +Y direction and the -Y direction, and disable/enable automatic stop.
Modes
All motor types have four different operation modes. Operation modes are accessible through a motor’s properties window. When Experior is connected to a PLC, you can set up the motor modes according to the tables below.
The following tables shows the four different Experior motor modes that can be used for interpreting the PLC’s motor inputs and outputs (note that the modes works differently when the Frequency Converter is enabled).
Without frequency converter
Normal
- Forward = 1, Backward = 0 -> forward direction
- Forward = 1, Backward = 1 -> forward direction
- Forward = 0, Backward = 1 -> backward direction
- Forward = 0, Backward = 0 -> stop
Stop
- Forward = 1, Backward = 0 -> forward direction
- Forward = 1, Backward = 1 -> stop
- Forward = 0, Backward = 1 -> backward direction
- Forward = 0, Backward = 0 -> stop
Two Modes
- Forward Speed1 = 1 -> motor runs forward at speed1
- Forward Speed2 = 1 -> motor runs forward at speed2
- Backward Speed1 = 1 -> motor runs backward at speed1
- Backward Speed2 = 1 -> motor runs backward at speed2
Forward/Backward
- Start = 1, Forward = 0, Backward = 0 -> stop
- Start = 1, Forward = 1, Backward = 0 -> forward direction
- Start = 1, Forward = 1, Backward = 1 -> ignore
- Start = 1, Forward = 0, Backward = 1 -> backward direction
- Start = 0, Forward = 0, Backward = 0 -> stop
- Start = 0, Forward = 1, Backward = 0 -> stop
- Start = 0, Forward = 1, Backward = 1 -> stop
- Start = 0, Forward = 0, Backward = 1 -> stop
With frequency converter
Normal
- Start = 1, Reverse = 0 -> run forward
- Start = 1, Reverse = 1 -> stop
- Start = 0, Reverse = 1 -> run backward
- Start = 0, Reverse = 0 -> stop
Two Modes
- Forward Speed1 = 1 -> motor runs forward at speed1
- Forward Speed2 = 1 -> motor runs forward at speed2
- Backward Speed1 = 1 -> motor runs backward at speed1
- Backward Speed2 = 1 -> motor runs backward at speed2
Forward/Backward
- Forward = 0, Backward = 0 -> stop
- Forward = 1, Backward = 0 -> forward direction
- Forward = 0, Backward = 1 -> backward direction
(note: the direction can’t be changed before the motor is stopped – the feedback signals can tell when the motor is stopped)