OEM Licence Type
The OEM licence type allows the user not only to tailor the icon and splash screen to make them more specific to their company/project, but also to limit what panes and menus are available.
To access the OEM version of Experior a OEM.config file has to be located under: C:\Users\<user name>\AppData\Local\Experior.
The OEM.config file can be created be using the -oem command:

The contents of this file can be edited to alter the functionality of Experior as shown below.
This first section allows the user to configure which panes or windows are available to other users.
This is done by changing the text between the tags from true to false or vice-versa.
  <Form>
    <Alarm>true</Alarm>
    <Catalog>true</Catalog>
    <Communication>true</Communication>
    <ControlPanel>true</ControlPanel>
    <FileLogger>true</FileLogger>
    <Inputs>true</Inputs>
    <Loads>true</Loads>
    <Log>true</Log>
    <Nodes>true</Nodes>
    <Outputs>true</Outputs>
    <Properties>true</Properties>
    <Routes>true</Routes>
    <Schedule>true</Schedule>
    <Script>true</Script>
    <SolutionExplorer>true</SolutionExplorer>
    <Statistics>true</Statistics>
  </Form>
The next 3 lines setup default paths on where to find the custom logos and splash screens for the OEM version of Experior that will be run.
The path starts from wherever the Experior executable is located.
<Icon>../../OEM/icon.ico</Icon>
<Image>../../OEM/Splashscreen.jpg</Image>
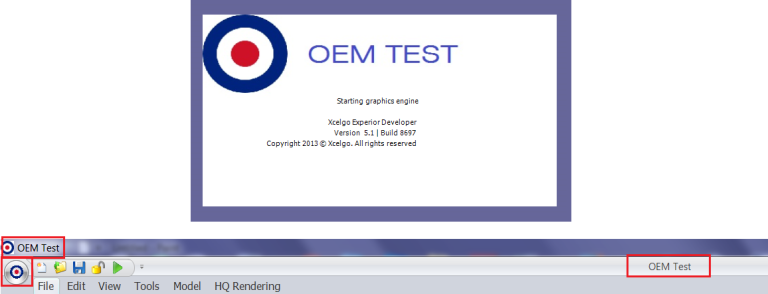
<Logo>../../OEM/Logo.gif</Logo>The image below shows a modified splashscreen and modified menu bar within Experior showing modified icons and window titles.
The next section allows the user to configure which menus will be available to users. This is simply done by changing the text between the tags from true to false or vice-versa.
  <Menu>
    <New>true</New>
    <Open>true</Open>
    <Save>true</Save>
    <Visible>true</Visible>
    <FPSReadOnly>true</FPSReadOnly>
  </Menu>
The next section allows the user to configure whether or not the model being shown can be moved around and/or selected.
  <Navigate>
    <Pan>true</Pan>
    <Rotate>true</Rotate>
    <Select>true</Select>
    <Zoom>true</Zoom>
  </Navigate>
The last section allows the user to configure the position of the Status and Information text on the splash screen and also assign a custom title to the Experior windows.
  <StatusLocation>
    <X>250</X>
    <Y>150</Y>
  </StatusLocation>
  <InfoLocation>
    <X>100</X>
    <Y>190</Y>
  </InfoLocation>
  <Title>My Title</Title>